Posted on
Wednesday, March 16, 2011
7:26 AM
| By:
Sheena and Seanna

Category:
bread
,
Rice
,
side dish

We had friends over for dinner on Saturday for a turkey that we smoked on the Traeger. It was amazing and so moist. If you have a Traeger grill I highly recommend trying a turkey on it. For me, however, the real star of the meal was the sides!
I made Garlic Cheese Rolls from Our Best Bites and Homemade Rice A Roni from Food Network Magazine.
First of all the Garlic Cheese Rolls were AMAZING! I had made them before but this time I didn't put them in a muffin tin like suggested. Instead I baked them in a 13x9" pan like cinnamon rolls. This kept the rolls softer and gooey in the center. My mouth waters just thinking of them. They came out of the oven about 20 minutes before the rest of the meal was ready and non of us could keep away from them. They ended up being appetizers as well as a side dish.
The Homemade Rice A Roni was also fantastic and so easy! I have now added it to "the binder" which means it is a new family favorite. I am always looking for side dish ideas and this was perfect. The recipe was from Food Network magazine but I am not sure which issue because I tore it out of the magazine to try. I love food network magazine and always find many things in every issue I want to try.

Homemade Rice A Roni (they call it Rice-Pasta Pilaf)
Toast 1/2 cup broken spaghetti in a pot over medium high heat with 2 tablespoons butter. Stir in 1 cup rice add 2 cups chicken broth, 1 cup water, 2 garlic cloves and 1 teaspoon salt. Boil for 3 minutes, then stir, cover and simmer 15 minutes. Let sit 5 minutes; fluff with a fork and smash the garlic. Stir in some butter and cilantro.

I know this isn't the best picture but when the cinnamon rolls come out of the oven at 9:30 PM you don't get the best light. These cinnamon rolls, however, were the best tasting rolls I have ever made.
I whipped these up for my husband and his friends to take camping and wasn't planning to eat one. When they came out of the oven all gooey and fresh with frosting dripping into every little crevice I couldn't resist.
The recipe is from All Recipes.com and is called Clone of a Cinnabon. The name says it all and they are definitely right on with the Cinnabon taste. My husband and I were both shocked at how similar they were. They immediately won a place in my "binder of favorites" and I plan to make them for special occasions only because they are dangerously good.
If you are looking for a killer cinnamon roll recipe give this one a try and you will not be disappointed.
Posted on
Monday, July 19, 2010
8:21 PM
| By:
Sheena and Seanna
Category:
bread
Just a quick note before I sign off for the night....I finally got an awesome looking loaf from my bread machine. I came home from the gym to find the most perfect looking little loaf waiting for me. I was so excited! I am thinking of trying another recipe from the Better Homes and Gardens Bread Machine Baking cookbook tomorrow just to see if I have more success. At this rate I am going to need to buy bread flour in Costco size bags!
Posted on
Wednesday, July 14, 2010
7:13 PM
| By:
Sheena and Seanna
Category:
bread
,
chicken

As usual our week hasn't gone according to my menu plan but it has been fun! Last night instead of making Gingery Chicken Tikka Kabobs with Minted Yogurt Sauce we ended up going to my in-laws for dinner.
It was so nice to have the night off from cooking and get to relax with family. My Husband's Sister just returned from a work assignment that kept her away since May. It was very nice to all be together and she brought us some amazing looking maple syrup which I am very excited to try.
Now back to the reason I titled this post delish. I ended up making the Gingery Chicken Tikka Kabobs with Minted Yogurt Sauce tonight and it was SO SO good! This will definitely be making an appearance at our house again.
I decided not to make the original pita recipe I linked to because I wasn't going to have enough time to do all the rising it needed. I ended up finding this recipe for pitas on All Recipes.com and they turned out beautifully. I would still like to try the other recipe when I have time. I also want to try this recipe but we will see. Do you have the best pita recipe?? If so please share!
Also if you try this Gingery Chicken Tikka Kabobs with Minted Yogurt Sauce please let me know what you think. I think it is amazing but I would love to hear your thoughts.
Gingery Chicken Tikka Kabobs with Minted Yogurt Sauce
from Working Mother Magazine June/July 2010
Marinade
2 Cups Plain thick Greek Style Yogurt (I used just regular plain yogurt because that is what I had)
1 (2-inch) Piece fresh ginger, peeled and pounded to a pulp
2-3 Garlic Cloves, crushed
2 Teaspoons Chili Powder (optional)
2 Teaspoons Ground Cinnamon
2 Teaspoons Ground Cumin
1 Teaspoon Ground Coriander
1 Teaspoon Ground Cardamon
Sea Salt and Fresh Black Pepper to taste
Freshly Squeezed Juice of 1 Lemon
Yogurt Sauce
6 Tablesppons Plain Thick Greek-Style Yogurt (again I used regular plain yogurt)
Freshly Squeezed Juice of 1/2 Lemon
2 Garlic Cloves, crushed
Sea Salt and Fresh Black Pepper to taste
1/4 Cup Chopped Fresh Mint (I know this is a huge difference but I used basil because that is what I had. Still super good!)
2 Pounds Chicken Breasts cut into bite size pieces
In a small bowl, whisk together marinate ingredient. In a large zip close bag toss chicken in the marinade making sure pieces are thoroughly coated. Seal bag, refrigerate and marinate for at least 2 hours or overnight. I did overnight and then some since we grilled this at 9:00 PM the next day.
To prepare the yogurt sauce, in a small bowl, whisk together yogurt, lemon juice and garlic. Season with salt and pepper, then stir in mint; set aside.
Drain chicken pieces, discarding any remaining marinade. Thread chicken onto prepared skewers and brush with melted butter. (We grilled ours without skewers since I was going to put them in pita bread anyway.)
Prepare a charcoal grill or preheat a gas grill. Cook kabobs about 3 minutes on each side, until chicken is nicely browned and cooked through. Serve with minted yogurt sauce on the side for dipping.
I served mine with grilled veggies in a pita with the sauce on top. A perfect mid-summer meal!
Posted on
Thursday, July 1, 2010
7:42 PM
| By:
Sheena and Seanna
Category:
bread
,
Breakfast

The first time I made these was in 2007. It was just after I got married, I wasn't working, and I liked to make a nice sit down breakfast on Saturday mornings to share with my new hubby. I saw this on an episode of Good Eats on the Food Network and it looked so good.
Fast forward to today I still make these and I love them because I can mix them up the day before and make them in the morning while I get ready. I even timed it right so I can make them on a work day! Can you believe it?!? Warm, fresh cinnamon rolls before heading to work! It makes for a great day.
The only adjustment I make to Alton Brown's perfection is I cook mine 5 minutes less than he says. I like my cinnamon rolls to be a little doughy on the inside.
Next on my list to try is copycat Cinnabon rolls. Yum-O!


I just wanted to share these beautiful pictures that I took yesterday of the downtown farmer's market. I am LOVING all the farmer's markets right now! My fiance and I went to one on Saturday morning and then yesterday during my lunch break I found this one. We bought blueberries, cherries, strawberries, blackberries, and granola from a local bakery.
I have also developed an obsession with
Dave's Killer Bread from farmer's markets. All their bread is made of all organic, whole grain, vegan, no corn syrup, artificial flavors or preservatives. It's the best! You can order it online or find it in your health food store depending on where you live. We actually found their
Sin Dawg this weekend which is the ultimate cinnamon roll bread. If you are a health nut like me but crave a sweet you definitely need to check this one out. Here is the picture to entice you..
Hope you all enjoy summer and all the wonderful farmer's markets!
Posted on
Wednesday, June 2, 2010
8:00 PM
| By:
Sheena and Seanna
Category:
bread

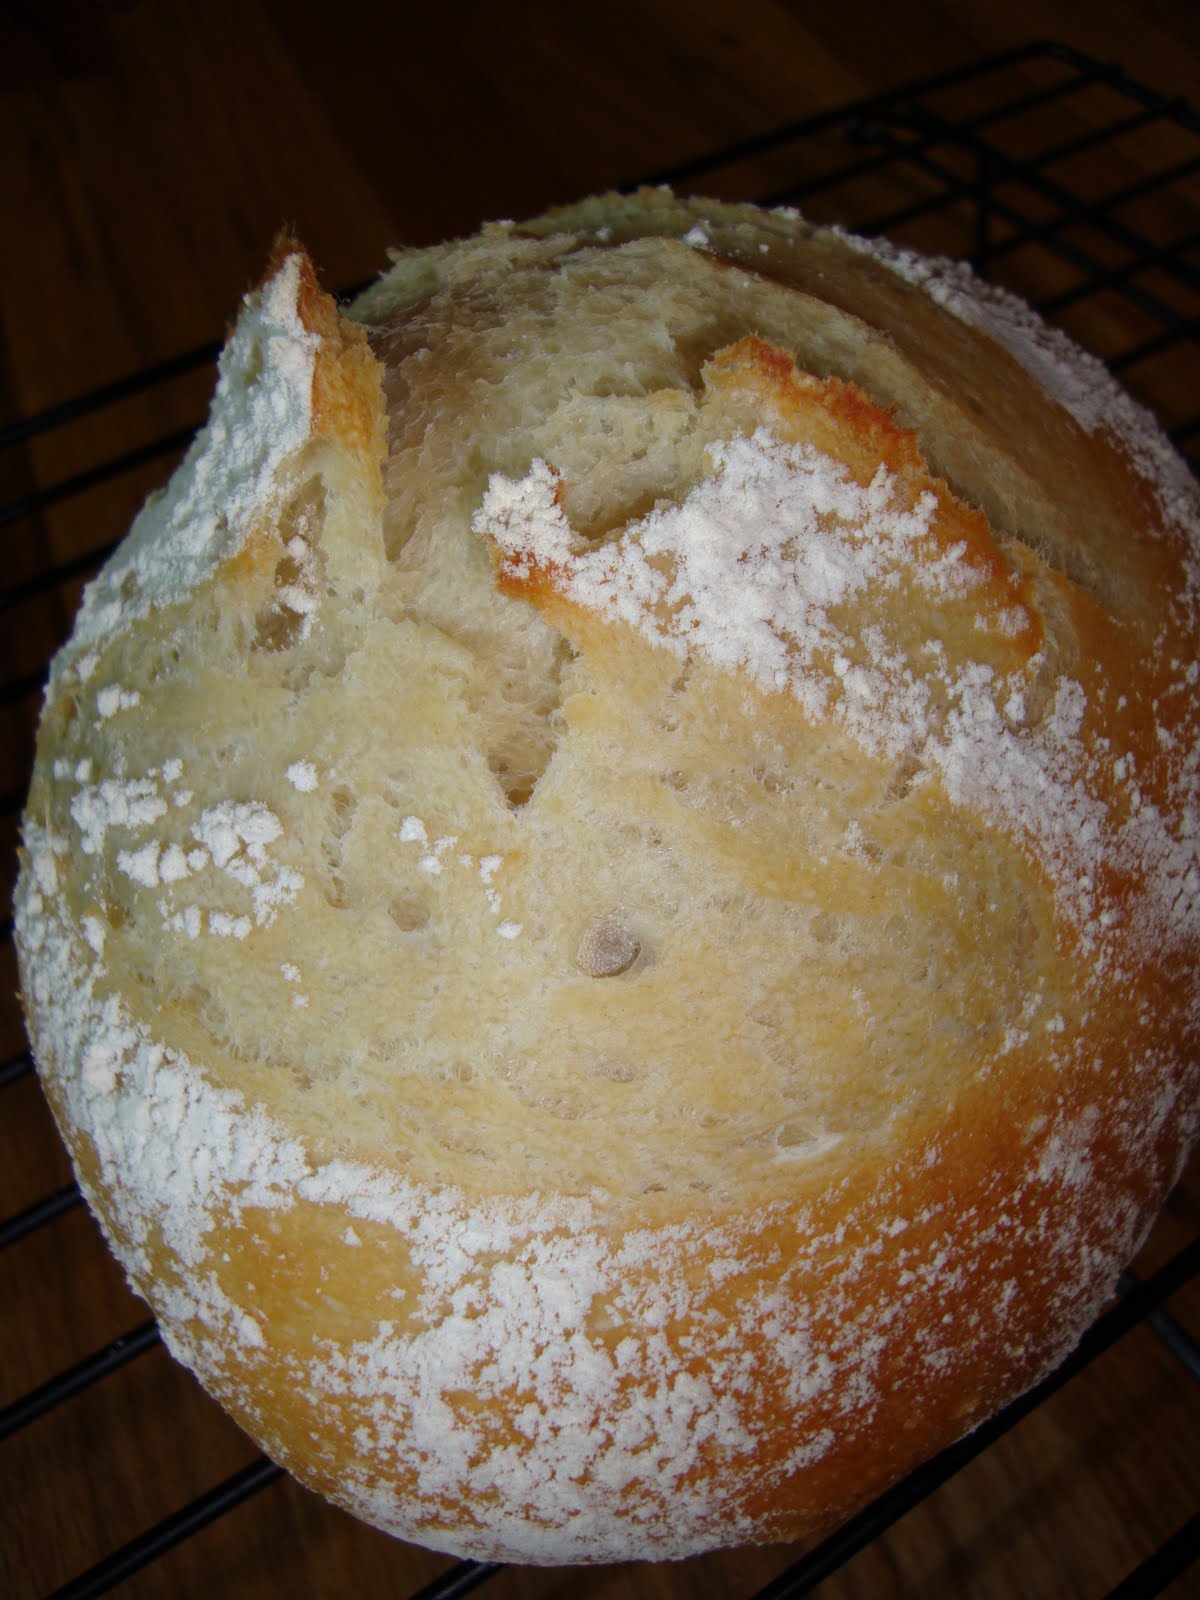
I love bread. I often judge a restaurant on how good the bread is. My husband knows that often times I will eat several pieces of bread and forget about the rest of my meal. I don't know why but to me there is nothing better than warm bread and butter.
For some time I have been reading on various blogs about Artisan Bread in 5 Minutes a day. I wanted to try it and checked the book out at the library twice. I am not sure why but something was always holding me back. I think I was just scared because it was a much different process than I am used to with bread.
Then one Sunday evening for no apparent reason I just jumped in and did it. I followed the books Master Recipe and was delighted with how easy it was. The long directions made me fear it would be hard but there was nothing hard about it at all. I set the dough on the counter to rise like the book talks about and looked at it every so often with pride as it grew.
The next day I made my first loaf. All we could say was WOW. It was amazing. A nice crusty exterior with a soft airy center. We ended up eating the whole loaf between the two of us (mental note do not make this daily if I want to wear any of my summer clothes).
If you have been holding back on trying this style of bread making don't wait any longer! It is not hard and the little work you put into it gives great results. I ended up liking it so much I ordered the book so I wouldn't have to end my bread making when the library wanted their copy back.

The Master Recipe from Artisan Bread in 5 Minutes a Day
3 Cups Lukewarm Water
1 1/2 Tablespoons Granulated Yeast
1 1/2 Tablespoons Kosher Salt
6 1/2 Cups Unsifted, Unbleached, All-Purpose Flour
Warm the water slightly, about 100 degrees. Add yeast and salt to the water in the bowl of your mixer. Mix in the flour all at once with the dough hook of your mixer. You're finished when everything is uniformly moist, without dry patches. Put the dough in a 5 quart bowl with a lid (not airtight). Allow mixture to rise at room temperature for 2 hours. After the rising put the container with the dough in the fridge to use as you like for the next 14 days.
On Baking Day
Pull a grapefruit sized portion out of the 5 quart container. Gently stretch the dough around to the bottom to create a ball. Let the loaf rise on a pizza peel generously (yes generously-I didn't use enough the first time and I almost couldn't get it to come off) coated with cornmeal for 40 minutes.
Twenty minutes before baking preheat the oven to 450 degrees with a baking stone placed on the lowest rack. Place an empty broiler tray for holing water on any other shelf that won't interfere with the rising bread.
When bread is done rising dust the top with flour and slash using a knife across the top. After 20 minutes of preheat you are ready to bake even if your oven isn't up to temperature. Slide dough off pizza peel onto baking stone. Pour 1 cup of hot tap water into the broiler tray and close the oven to trap steam.
Bake for 30 minutes. Try to wait for it to cool to eat :)

Posted on
Thursday, May 13, 2010
7:18 AM
| By:
Sheena and Seanna
Category:
bread
,
corn
,
side dish

(Sorry for the less than amazing photo....this stuff just didn't want to be photographed.)
Do you ever eat at Chevy's? If so, you will know what I am talking about when I refer to the sweet little goodness of corny stuff that arrives with your meal. It is so good, moister than cornbread and sweeter too. I found this recipe for making it at home on All Recipes back in 2007. I have made it many times since then and we always love it. It is not going to look like cornbread when you take it out of the oven and the directions say to serve it with an ice cream scoop so don't be alarmed.
The only ingredient on the list that you may not have at your house already is Masa Harina. This is a corn flour that can be found at almost all grocery stores. I actually purchased my bag at Winco. It is worth the extra purchase just to make this delicious side dish.
Sweet Corn Tomalito from All Recipes
5 Tablespoons Margarine, softened
1/4 Cup Masa Harina
1/3 Cup White Sugar
1/2 Cup Water
2 Cups Frozen Whole-Kernel Corn,
thawed
1/2 Cup Cornmeal
1 Teaspoon Baking Powder
1/2 Teaspoon Salt
4 Teaspoons Milk
In a medium bowl, mix together the margarine, masa flour, and sugar until light and fluffy. In a food processor or blender, blend one cup of the corn kernels with the water and cornmeal just until smooth. Stir into the masa mixture. Mix in the remaining corn, baking powder, salt, and milk until the batter is smooth. Pour into an 8x8 inch glass baking dish.
I have changed how I cook it compared to the original recipe. I cover my 8x8 pan with foil and then place it in a 9x13 pan that is filled 1/3 of the way full with water. I put that whole pan into an oven heated to 350 degrees and bake for 50-60 minutes. Let cool ten minutes and use an ice cream scoop for easy removal from the pan.
Posted on
Monday, May 10, 2010
8:52 PM
| By:
Sheena and Seanna
Category:
bread
,
Breakfast
,
Desserts


There has been a package of refrigerated biscuit dough looming over me in the fridge. It never seems to fit a meal that I am making and I knew it was getting past its prime. Each time I opened the fridge to get something I would see it in there begging to be used before it had to be thrown away. Last night after all of our Mother's Day festivities I pulled out a recipe for Easy Doughnuts and got busy.
If you know me I NEVER fry. I think there is one other thing I have fried and it was an accident (I started a recipe and was too far into it when I discovered something had to be fried to turn back). So this was very out of character for me. It turned out to be a lot of fun and I was so impressed with myself I had to call my parents over to try them. Everyone thought they were yummy and I was happy I didn't burn the house down.
If you want to try homemade doughnuts I think this is possibly the easiest way to do it. Good luck!


Easy Doughnuts (from Real Simple May 2007)
3/4 Cup Vegetable Oil
1 Package Large Refrigerated Biscuits
1/2 Cup Sugar
1/4 Teaspoon Ground Cinnamon
Heat 1/2 cup of the oil in a medium skillet over medium low heat. Place the biscuits on a cutting board. Using a 1 inch round cookie cutter or shot glass, cut a hole in the center of each biscuit, reserving the extra dough for "holes."
Test the heat of the oil by dipping the edge of a doughnut in the pan. When the oil is hot enough, the edge will bubble. Place 4 of the doughnuts and holes in the skillet and fry until golden brown, 1 to 1 1/5 minuets per side. Transfer to a wire rack or paper towel lined plate to drain. Add the remaining oil to the skillet, reheat and cook the remaining doughnuts and holes. In a large bowl, combine the sugar and cinnamon. Gently toss the warm doughnuts in the mixture a few at a time. Serve warm.
Posted on
Wednesday, May 5, 2010
9:03 PM
| By:
Sheena and Seanna
Category:
bread
,
pumpkin

I saw these in a post on Money Saving Mom back in November and have been meaning to try them ever since. Today happened to be the day when all the stars aligned (meaning I had all the ingredients and the time) to make these. We also ended up with last minute dinner guests so it all worked out perfectly.
These rolls were amazing! So so so good and not too hard to make either. They also worked perfectly in my quest to clean out the freezer in time for summer. Don't be scared that these rolls have pumpkin in them. Nobody in our group could even taste the pumpkin and everyone thought they were some of the best rolls ever.
I think the pumpkin makes them so moist and a beautiful color. Also the pumpkin adds lots of vitamins to the rolls...bonus! I felt like the Sneaky Chef.
If you have any pumpkin lingering at your house from this last fall please try these rolls. You will be so impressed. One word of advice-eat them in moderation. They were so good I had three and now by stomach feels like it will explode!
The recipe I used was on Money Saving Mom but it originally came from Tammy's Recipes. If you try these let me know what you think!
Posted on
Monday, April 26, 2010
8:23 PM
| By:
Sheena and Seanna
Category:
bread
,
Desserts

I know it really isn't the season for this but I am working to clear out my freezer to make room for the coming summer. We plant a big garden at my Grandparents house and have lots of stuff that gets a home in the freezer for the rest of the year. Right now I have quite a bit of stuff that still needs to be used up so for several weeks I have been working to use things we have.
Tonight what I wanted to use was some pumpkin that I cooked and pureed down last October. I was so excited when I learned how to do it that I made tons of pumpkin to freeze for later. I decided tonight was perfect to make Pumpkin Bread with Cream Cheese Icing since I also had a little cream cheese to use up after the Taquitos last week.
I took the finished dessert to my parents to have after dinner and it was a huge hit. I was happy everyone liked it even though pumpkin isn't really a flavor you think of in April.

Pumpkin Snack Bread
(this is from a magazine but since all I have is a copy of a copy I am not sure which magazine)
1 Cup Brown Sugar
2 Eggs
1 Cup Pure Pumpkin
1/4 Cup Canola Oil
1/3 Cup Plain Yogurt
1 Teaspoon Vanilla
1 3/4 Cup Flour
1 1/2 Teaspoons Baking Powder
1 Teaspoon Ground Cinnamon
1/2 Teaspoon Nutmeg
1/2 Teaspoon Baking Soda
1/2 Teaspoon Salt
In a large bowl, with wire whisk, combine brown sugar and eggs. Add pumpkin, oil, yogurt, and vanilla; stir to combine.
In a medium bowl, combine flour, baking powder, cinnamon, nutmeg, baking soda, and salt. Add flour mixture to pumpkin mixture; stir until just combined.
Pour batter into loaf pan and bake at 350 degrees for 45-50 minutes or until a toothpick inserted in center of loaf comes out clean.
For the icing I used this recipe from All Recpies.com Cream Cheese Icing -It was a winner :)
 Last night I made a Stuffed French Toast form MyRecipes.com. I thought it would be nice to make and then take over to my fiance's house so that he could have warm breakfast leftover for his busy work week. The recipe was exactly as the reviews on the site had said, a little too runny but fixable by using 3/4 the amount of liquids. Although runny, the taste was fine. Even so, I think I am going to be asking for my Grandmother's recipe since she makes a similar one for Easter. I will post her recipe once I have time to try a round two.
If you would like try this one, click here. Tell me what you think...
Posted on
Wednesday, November 4, 2009
8:32 PM
| By:
Sheena and Seanna
Category:
bread
,
Desserts
Posted on
Saturday, October 24, 2009
10:05 PM
| By:
Sheena and Seanna
Category:
bread
,
pumpkin